Cloud Server Installation
Follow these steps to create a dedicated cloud server.
In this example, we are going to use Digital Ocean, but the server application can be hosted on any cloud provider of your choice.
If you do not have an account already, you can use this referral link to create an account, and the first two months will be free.
https://m.do.co/c/ca46a35fd4dd
Prerequisites
You will need to download these two applications in order to access your server. One is a SFTP file manager and the other is a SSH command line tool. These tools are for Windows, but there are plenty of SFTP and SSH alternatives on Mac/Linux.
WinSCP: https://winscp.net/eng/index.php
Putty: https://www.chiark.greenend.org.uk/~sgtatham/putty/latest.html
(Recently it seems like the putty website is often down, I managed to install it from the Windows Store instead).
When installing Putty, make sure to also install PuttyGen (it is to generate ssh keys).
Create a Droplet
After you created a Digital Ocean account and entered your credit card information, and that your account is ready to use, you are ready to create a Droplet.
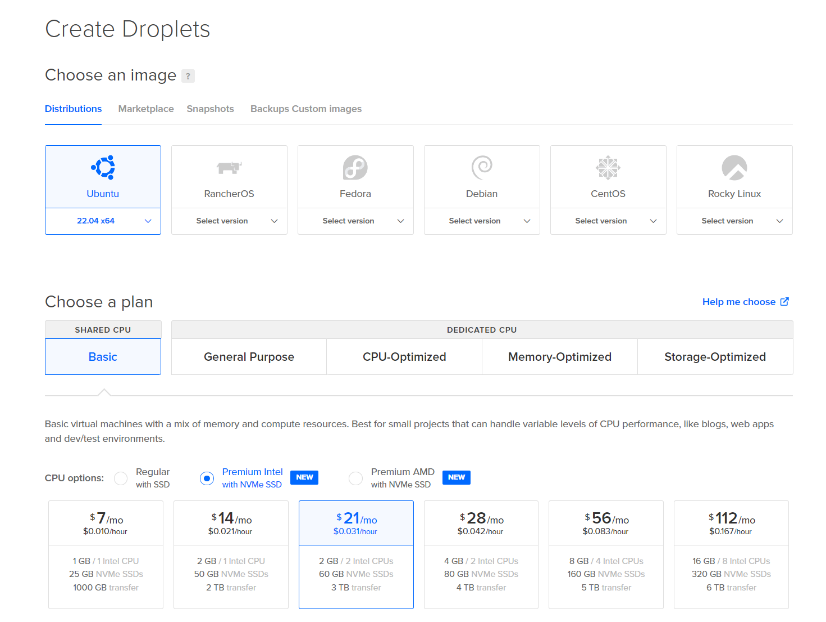
1) In Droplets section, click on Create -> Droplet
2) Select the OS: I use Ubuntu 22.04
3) Choose the specs of your server
I use the $20 server personally, but you may be fine with a cheaper one for development, or may need a bigger one depending of your player count. I would go with at least 1GB+ ram, many users had issues with the 512mb ram droplet.
4) Choose any region (closest to you will have better performances).
5) Select a SSH key (see next section to generate a new one)
6) Select a hostname for your server (can be anything).
7) Click Create Droplet

Once your droplet is ready, the IP of your server will be displayed. You will need that IP later when creating the unity build.
Generate SSH key with PuttyGen
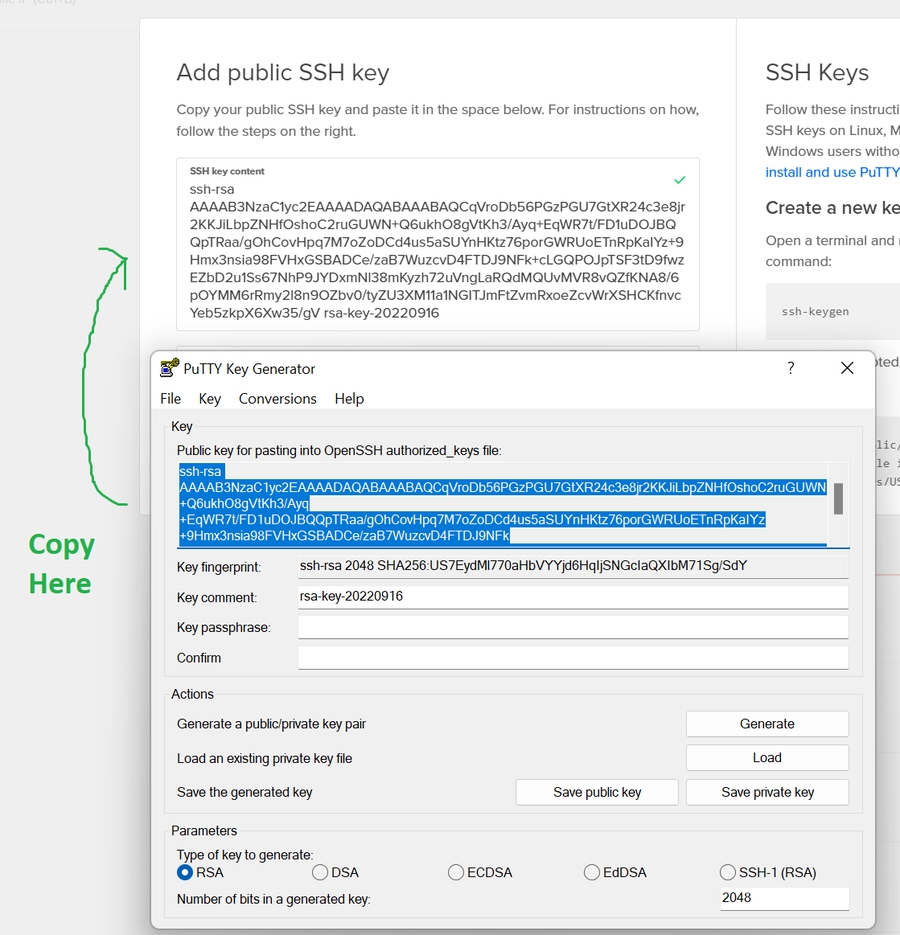
To generate a key, open PuttyGen and click on generate.
Once done, save the private key file on your computer.
Then copy the public key displayed on screen to Digital Ocean.
On Digital Ocean, Add a name to your key and then click on Add SSH key.
Make sure to store your private key file in a secure place, if you lose the key you won’t be able to access your droplet.

Create the Server Build in Unity
Before creating your server build, make sure the Resources/NetworkData settings are correct.
Set your URL to the server IP (or domain of you have one). And set the port you want to use.
When building the game server. You only need to include the Server scene. Since our Digital Ocean server is on Linux, select Linux as the platform on x86_64, and check the box Server Build (In some Unity versions it is a different tab called "Dedicated Server").
Connect to your server with WinSCP
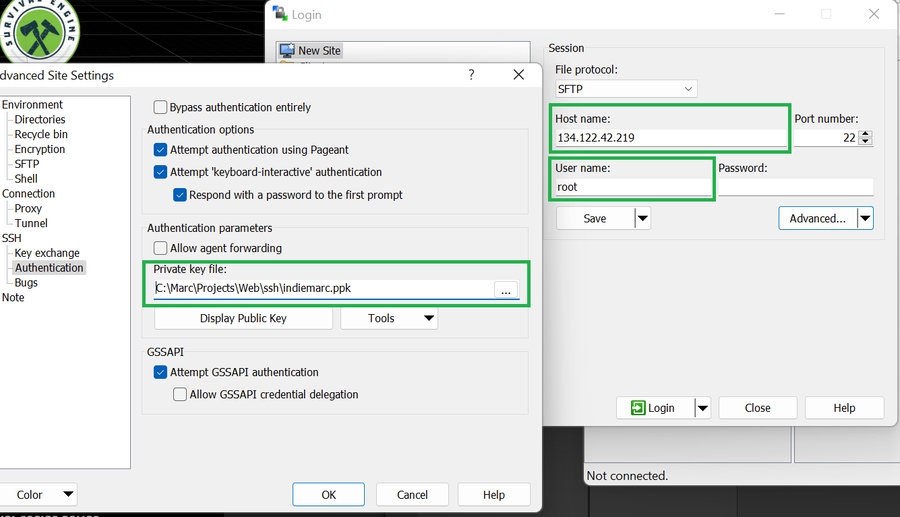
Open WinSCP and create a new connection.
Enter the IP of your server as Host, and enter root as the username.
The password is blank since we use a SSH key instead.
Click on Advanced, then SSH/Authentification, then select your private key file there.

This will give you access to the server files, now you can upload your build into any folder, in my demo I created this folder:
Important: /root/server/game is not the same as /server/game, do not install inside /root/ because that is a reserved folder for the root user. And some people experienced issues installing inside /root/

To access the command line, from WinSCP, click on Commands->Open in Putty.
Once you gain access you can navigate to the server folder with
Now we need to give the server permission to execute our build, to do that, we can run
Test the Game Server
Run the game server to test it:
Now you should be able to connect to it from your client build (or from unity). Before you run the client, make sure that Resources/NetworkData url is set to your server ip, and also add back all the client scenes in your build settings.
Launch the game, and from the menu, click on Multiplayer.
If the screens shows "Connecting to server" it can't connect. If it shows "Searching for player" This means you are successfully connected!
In putty, use Ctrl-C at any time to stop the server from running and return to command line.
Run the server as a Service
While running directly the game server is a good way to test (since you can see the live debug console). This method isn’t persistent and your app will stop as soon as you leave putty. To create a persistent server you need to create a service.
In Unity, go to TcgEngine/Install folder, there should be a tcg.service file there.
Upload that file to your server at this path:
Open the file you just uploaded (double click in WinSCP) then make sure the path to your game server is set correctly.
To start/restart/stop the service, you can use these commands from putty (“tcg” is the name of your service file).
You can also run this command to check if the service is running
(and use ctrl-c when you want to quit top)
Now that your service is running, you can try to connect to it from the client build or from Unity. In the same way you connected to it before.
Firewall setup
It’s good to block the port you don’t use on your server, from the command line, you can run
And to check the status of your firewall:
Be sure to always run allow ssh before enabling the firewall, otherwise you will lose your putty connection and won’t be able to connect anymore.
Updates
If you make changes to the data or gameplay logic, and need to rebuild your game server. To re-upload all you need to do is first:
Then, reupload your game server in WinScp inside /server/game. You don't need to delete previous files if the build has the same name, they should be overwritten, this way you don't need to call chmod. If you deleted the files you may need to call chmod again.
Last updated